Slate + Spontaneity = Progress
I have been interested in working with slate for quite a while. Ever since seeing mosaic art by Dugald MacInnes, I have been intrigued by the material. In the summer of 2013, while helping with Lynn Adamo’s Sturgeon mosaic public art, I had an interesting conversation with Karen Rycheck who was also working on the piece. She explained to me how she worked with slate floor tile. With that knowledge in hand, I decided to go for it. However, instead of floor tile, I wanted to use roofing tile. I found a source for that roofing tile (they had colors) and developed a technique for producing the tesserae. Needless to say, the technique described by Karen did not work for roofing tiles. I’ll describe this in a future blog.
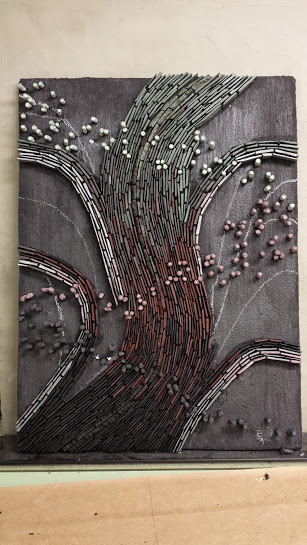
With the slate tesserae in hand, I decided to create a smallish piece to avoid getting bogged down in months of work. I also wanted to use a more spontaneous, serendipitous approach to the work, a practice largely foreign to me.

I started with a simple curvy line……well two actually because I didn’t like the first one I drew.

I applied the first tesserae to this line, a uniquely textured group cut from the edge of the tiles. I then added an element that I had been experimenting with – tusk shells that had been painted with colored thinset. Unlike most tusk shell applications that I’ve seen in mosaics, I didn’t use them pointy side up. Instead, I cut the pointy tips off and applied them to the substrate vertically, fat side up. The design flowed from the moment. No planning, no pre-mediation and I loved the result.

The piece grew over the next few days and I’d never felt freer working on a mosaic. No constraints except those imposed in the moment. Blend the colors – black to red to dark green to light green. Fatten the trunk along the original line. Hey, let’s add branches. Boom, done. Where was this going? I had no idea but I was digging the process.

The technique I used was to add several rows of tesserae, let the thinset dry over night, then paint the dull, whitish pieces with a stone enhancer. My favorite part of the day was always first thing in the morning when I painted the tesserae with the rock enhancer and that burst of color leapt out. Compare this photo to the one above and you can see this. You can also see it in the following pics.


More branches and fattening. More bursting of color.


A problem area developed near the end that hounded me for several days. I just could not get it right. You can see the white hole in these two photos. I reset the tesserae three times. The final time, the thinset had hardened but I still tore the tesserae out. It was a huge mistake and I had to work really hard to recover. I think I was being unnecessarily hyper-critical and kind of lost myself.
What a great experience and I love the results. I’ve titled it “Progress”. I’m already starting further pieces using this material and my new found freedom. Wish me luck.

Sorry, the comment form is closed at this time.