Building a system for safely shipping a 2D mosaic
“Hope for the best but plan for the worst”
I had the good fortune to have my mosaic A Prayer For Earth accepted into the Society of American Mosaic Artist 2015 Mosaic Art International exhibition in Philadelphia. I was, obviously, ecstatic and, yes, emotional about this news but my elation was soon replaced by dread over the looming prospect of shipping the piece to Philadelphia. Being a relative newbie, I had never shipped a mosaic and had only the faintest idea of how to do it.
Thinking that it somehow involved crates and bubble wrap, I began my exploration by querying my fellow NW mosaic artists. I received some good information but I felt that the guidance lacked the details that I needed to safely ship the piece cross-country. I continued on my quest with internet searches and found the best information on YouTube. Here are the links that provided most of the information I used to build my shipping system.
- https://www.youtube.com/watch?v=1-paqlhfd20 – a very good discussion of handling, packing and shipping of art by Jerry Speight who does this for the Indiana Museum of Art
- https://www.youtube.com/watch?v=G0VITtMrjpE – a discussion by an artist for packing art for shipping
- https://www.youtube.com/watch?v=bXRj4N1BWhs – a simple video that helped me comprehend how to make a custom sized cardboard box
After reviewing these videos, my requirements became:
- Protect the mosaic from damage during shipment
- Allow relatively easy unpacking at the destination
- Allow relatively easy reuse of the packing system for return shipment
- Insure the piece for it’s full value for destination and return shipments
I set about planning and building a shipping system that would fulfill these requirements. I decided to employ a box in a box. The inside box would be made of cardboard and the outside box would be a wood crate. The art would be covered with Tyvek sheeting and nestled in soft open cell foam within the cardboard box. The cardboard box would be nestled in firm closed cell foam within the wood crate. The Tyvek sheeting would protect the piece from the open cell foam. The open cell foam would protect the piece from vibration. The closed cell foam would protect the piece from shock. I decided to build the shipping system from the inside out since I thought it would be easier to measure the dimensions rather than calculate them. In the future, I will calculate the dimensions which, it turns out, is actually easier.
After purchasing the materials, the first step was cutting the foam to fit around the mosaic. Jerry Speight, in the first video referenced above recommended polyester foam for protection from the vibration of shipping. I could not find a retail source in Portland so I settled for polyurethane foam.

The 1.5″ soft polyurethane foam was cut with a sharpened kitchen knife.

A top layer, a bottom layer and 4 side layers were cut from the polyurethane foam based on measurements from the mosaic.

Measurements for the dimensions of the cardboard box were taken after assembling the foam pieces around the mosaic.

The bottom half of the box was cut from the cardboard and creased using a wide dull chisel and a slight blow from a rubber mallet.

The corners were attached with a glue gun and taped with gummed paper tape.

The dimensions for the top of the box were measured off of the assembled box bottom and constructed in the same way as the top.

The bottom half of the cardboard box was lined with the polyurethane foam to create a cavity that would gently cradle the piece when the top sheet is installed.

After the Tyvek sheeting was cut to size and washed in the washing machine to improve it’s hand, the foam cavity in the box was lined with the material.

The mosaic was gently fit into the Tyvek line cavity.

The Tyvek was folded over the piece and tucked into the sides of the piece.

The top sheet of foam was placed over the Tyvek wrapped mosaic and the box top was slid over the whole assembly. Finally, plastic strapping was wrapped around the box in two directions, joined and tightened with reusable connectors.
The 1″ polyethylene foam was cut into 2″ strips using a sharpened kitchen knife. A top and a bottom matrix was created from these strips. 2 long edge side bumpers and 2 short edge side bumpers were also created. (View the video at the first link above to see how to “glue” polyethylene together with a heat gun.)

Measurements for the dimensions of the wood crate were taken after assembling the foam pieces around the cardboard box.

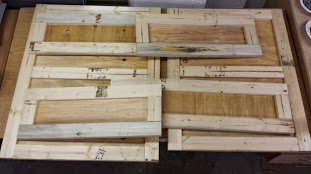
The panels and rails for the wood crate were cut from 3/8″ plywood and 1″X 3″ dimensional lumber.

The six panels were glued and stapled using a pneumatic staple gun.

The panels were glued, stapled and screwed together to form the open crate.

The bottom foam matrix and three of the foam side bumpers were hot glued onto the bottom and sides of the wood crate. One long side foam bumper was left free to provide easier installation and removal of the cardboard box.

The cardboard box assembly was nestled into the wood crate / foam matrix enclosure.

The top foam matrix was fit onto the top of the cardboard box.

The top was placed on the crate and screwed down using 8 stainless screws and finish washers. One at each corner and one on each side.
Unpacking and packing instructions were included in the crate to aid with the unpack and repack of the work. I also wrote unpacking instructions on the crate top, the polyethylene foam, the cardboard box and the polyurethane foam.
Apparently, UPS and FedEx will only insure art for up to $500. However, I discovered that the Postal Annex in Portland will provide loss and damage insurance up to $5000 on art shipped with FedEx at a cost of about 1% of the value covered. They did, however, need to be visually assured that the art was packed correctly.
Here is the final tally for the cost:
polyethylene foam $ 25
polyurethane foam $ 30
cardboard $ 6
Tyvek sheeting $ 6
3/8″ plywood $ 15
1″ X 3″ lumber $ 11
screws & washers $ 12
Materials Total $105
Stapler & compressor rental $ 63
Materials & Tools Total $168
Shipping and Insurance $255 (destination and return shipping)
Total Cost $423
Did the system work? Well, I don’t know yet since I just delivered the package for shipping. However, I will provide an update to this blog after the shipment has completed.
Sorry, the comment form is closed at this time.